How To Patch a Hole in Drywall Like a Professional
Are you trying to find out how to patch a hole in drywall like a professional? It happens in an instant. You’re maneuvering a piece of furniture around a tight corner, a door is flung open a bit too vigorously, or an indoor game of catch goes terribly wrong. Suddenly, you’re staring at an ugly, jagged hole in an otherwise perfect wall. It’s frustrating, unsightly, and instantly makes your home feel a little less put together.
Before you panic and start Googling expensive contractors, take a deep breath. While it might look intimidating, damaged drywall is surprisingly easy to fix. In fact, learning how to repair wall damage is one of the most essential and high-value DIY skills a homeowner can possess. Instead of paying the high national average for a handyman visit just for a minor patch job, you can achieve the same results for a fraction of the cost over a weekend.
However, there is a distinct difference between just filling a hole and truly repairing it. Almost anyone can slap some spackle into a dent and call it a day, resulting in a noticeable hump on the wall forever. The goal of this guide is to teach you the techniques professionals use—specifically how to tape, mud, and “feather” the patch—so that once the paint dries, the damage is completely invisible.
We are going to walk you through the exact steps required to turn that eyesore into a seamless wall once again.
Assess the Damage (Size Matters)
Before you rush to the hardware store, you need to measure the monster you are dealing with. A common mistake beginners make is trying to fix a doorknob-sized hole with the same method used for a tiny nail pop. This almost always leads to the patch cracking or falling out a few months later.

Drywall repairs generally fall into three categories, and the repair method depends entirely on the size of the hole:
1. Tiny Holes (Nail Pops & Screw Holes)
-
Size: Smaller than a dime.
-
The Fix: These are the easiest to handle. You don’t need tape or backing; a simple dab of lightweight spackle is sufficient. However, for anything larger than this, you must understand the difference between spackle and joint compound. Spackle is great for tiny dings, but it shrinks and cracks if you try to use it for larger structural repairs.
2. Medium Holes (The “Doorknob” Accident)
-
Size: Up to 4 inches wide.
-
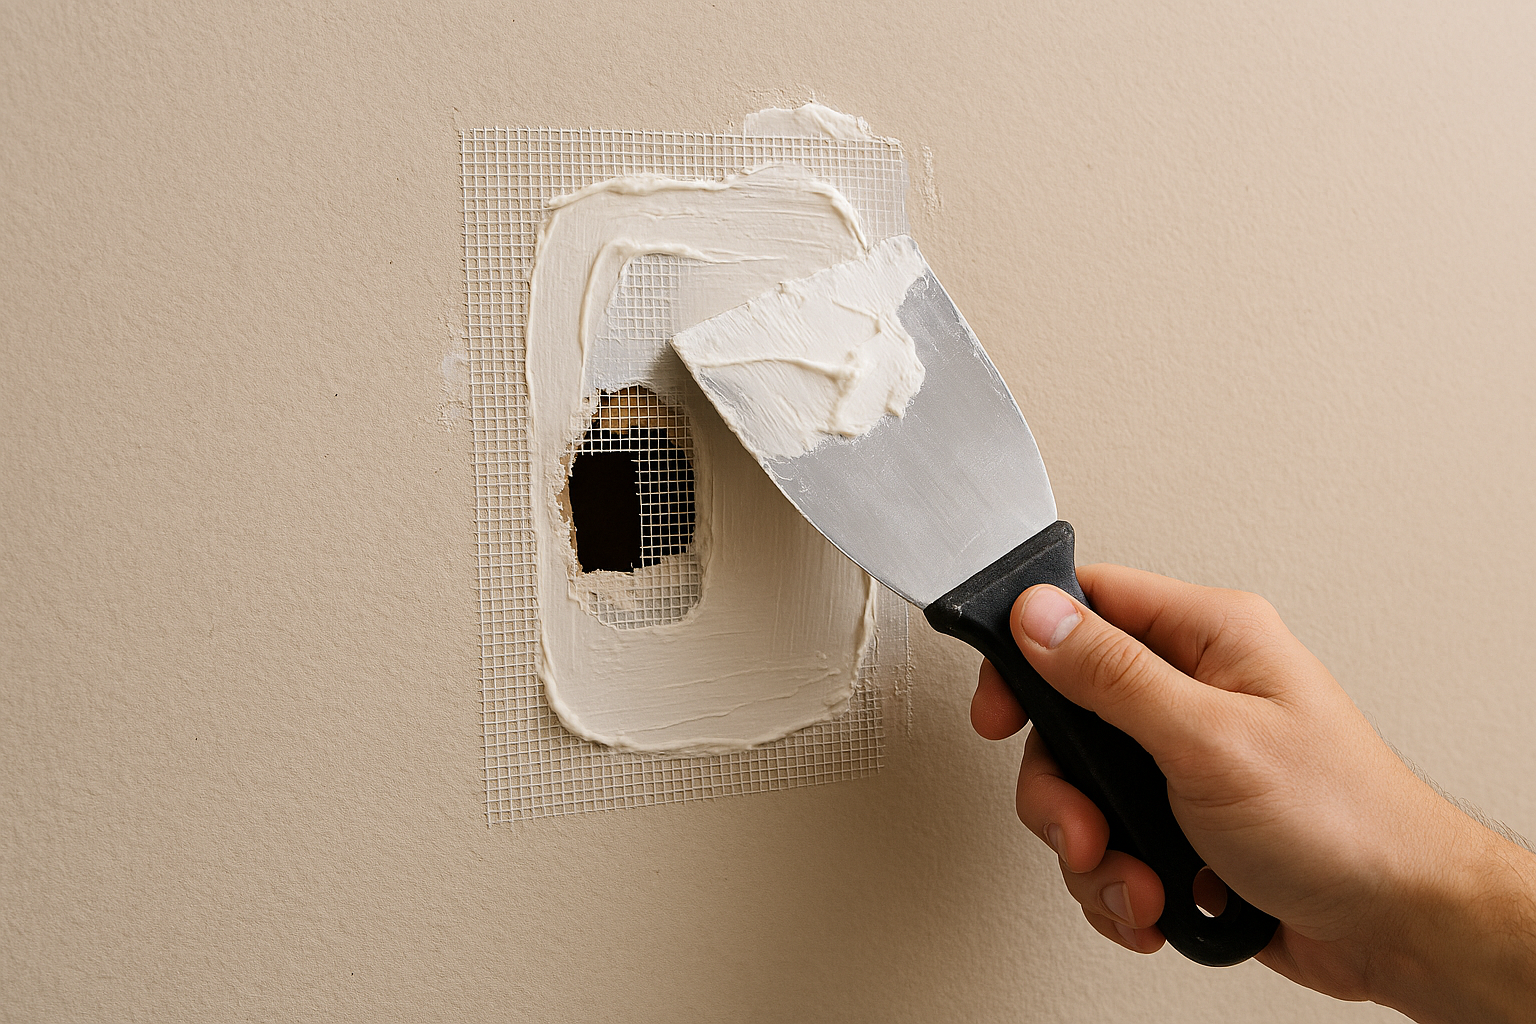
The Fix: This is the awkward middle ground. You can’t just fill it with mud (it will just fall into the wall cavity), but you don’t necessarily need to cut a massive new piece of drywall. For these, an adhesive mesh patch or a “California Patch” (using a scrap piece of drywall) is often the most efficient solution.
3. Large Holes (The “oops” Moment)
-
Size: Larger than 4 inches.
-
The Fix: If someone fell into the wall or you had to cut out water-damaged rock, you are in “cut-and-replace” territory. You will need to cut the hole into a clean square, install a wooden backing or “furring strip” inside the wall, and screw in a new piece of drywall. This ensures the wall remains rigid and doesn’t flex when you lean on it later.
Note: The rest of this guide will focus on the Medium to Large hole repair, as this is the most intimidating task for homeowners and requires specific professional techniques to hide.
Gather Your Tools & Materials
Trying to patch drywall with the wrong tools is like trying to eat soup with a fork—messy, frustrating, and ineffective. The secret to a professional-looking repair isn’t magic; it’s having the right equipment to blend the patch subtly into the surrounding wall.
Fortunately, the tools required are relatively inexpensive and will serve you well for years of future home maintenance projects. Before you begin, screenshot this checklist and head to your local hardware store or amazon
It is highly recommended to invest in a basic set of proper drywall taping tools rather than trying to make do with a single, stiff putty knife you found in the junk drawer.
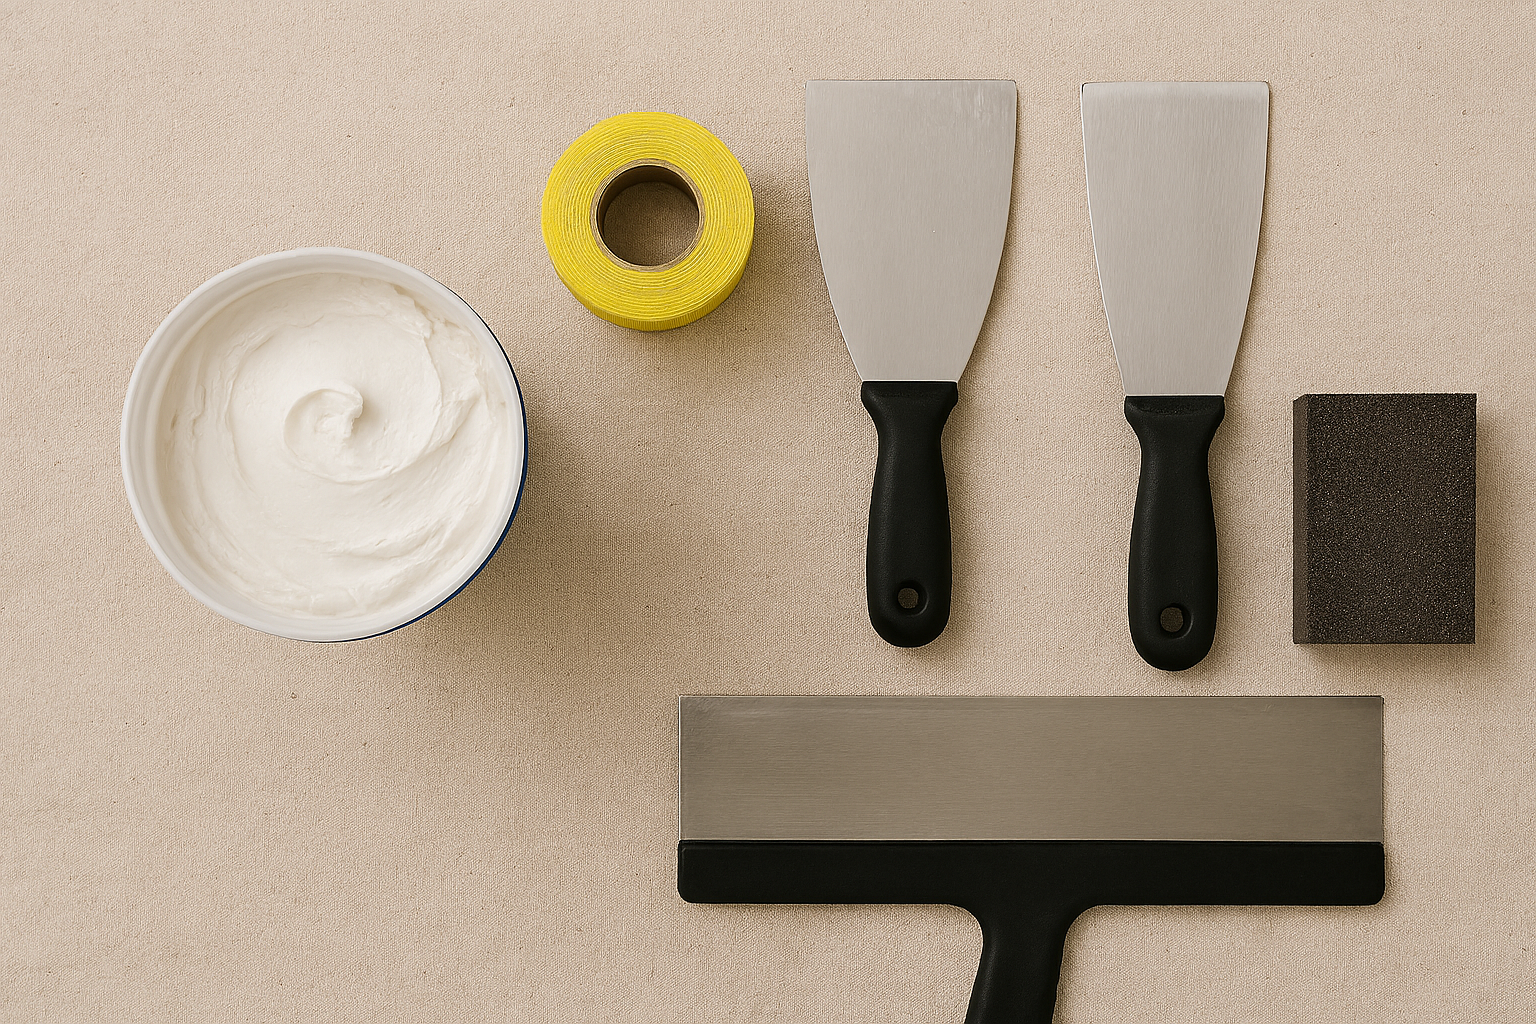
The Essential Toolkit
-
Joint Compound (“Mud”): For most homeowner repairs, an all-purpose, pre-mixed joint compound (sold in a bucket) is the easiest to use. It dries slowly, giving you plenty of working time.
-
Drywall Tape: You have two choices:
-
Paper Tape: Stronger and preferred by pros for corners, but requires more skill to bed properly without creating bubbles.
-
Self-Adhesive Mesh Tape: Much easier for beginners because it sticks to the wall on its own, but it is slightly less strong than paper. For flat patches, mesh is usually fine.
-
-
Taping Knives (Putty Knives): You cannot do this job with just one knife. You need graduating sizes to “feather” out the repair.
-
6-inch knife: For bedding the tape and applying the first coat.
-
10-inch or 12-inch knife: For applying the final, wide coats that blend the patch into the wall.
-
-
Utility Knife or Drywall Saw: For cleaning up jagged edges or cutting new pieces of drywall.
-
Sanding Sponge: A medium/fine grit sanding sponge creates less dust than loose sandpaper and conforms nicely to the wall.
For Larger (Cut-and-Replace) Holes:
If your hole is larger than 4 inches, add these to your list:
-
Scrap Piece of Drywall: To fill the hole. (Home centers often sell small 2×2 foot repair panels so you don’t have to buy a massive sheet).
-
Wooden Backing: A paint stirrer stick, a wooden shim, or a piece of scrap lumber to place inside the wall for stability.
-
Coarse-Thread Drywall Screws: 1-¼ inch screws are standard for securing the new piece to the wooden backing.
Step-by-Step Repair Guide (The “Cut-and-Replace” Method)
This section covers the “Cut-and-Replace” method, which provides the most structural stability for medium-to-large holes. If you skip steps here, you risk the patch cracking when the house settles or the seasons change.
Step 1: Square Up the Hole
It is incredibly difficult to cut a piece of drywall to fit a jagged, lightning-bolt-shaped hole. The professional approach is to turn that random damage into a clean, geometric shape.

Using a framing square and a pencil, draw a square or rectangle around the damaged area. Use a drywall keyhole saw to cut along your lines. Be careful to check for wires or pipes inside the wall before plunging the saw in too deep. A clean edge is critical because it ensures your new piece of drywall will fit tightly, requiring less mud to fill the gaps.
Step 2: Create a Backer
You cannot simply glue the new piece of drywall into the void; gravity will eventually win. You need something solid behind the patch to screw into.
Cut a piece of scrap wood (pine or plywood) that is about 4 inches longer than the vertical height of your hole. Insert the wood into the hole, holding it tight against the backside of the existing drywall. Drive drywall screws through the existing wall and into the wood to secure it in place. According to This Old House, this backing strip acts as a bridge, unifying the old wall and the new patch.
Pro Tip: Countersink your screws slightly below the surface of the paper, but don’t break the paper!
Step 3: Measure and Cut the New Piece
Now, measure the opening you created in Step 1. Transfer those exact measurements to your scrap piece of fresh drywall. Score the paper side with your utility knife, snap the gypsum core, and cut the paper backing.
Place the new piece into the hole. It should fit snugly against the wooden backer you installed. Secure it by driving two screws through the new piece into the wooden backer.
Step 4: The Taping Phase
This is the step most beginners want to skip, but you must tape the seams. Without tape, the vibrations of your home will cause a hairline crack to form around your square patch within weeks.
If you are using self-adhesive mesh tape, simply apply it over the four seams. If you are using paper tape, apply a thin layer of joint compound to the seams first, press the tape into the wet mud, and smooth it out with your 6-inch knife. The goal is to embed the tape so it becomes part of the wall.
Step 5: The “Feathering” Technique
This is the secret sauce that separates a “landlord special” repair from a professional one. You aren’t just filling the crack; you are creating an optical illusion.
Using your wider 10-inch or 12-inch knife, apply a second coat of mud over the tape. However, do not just cover the tape—spread the mud out 10 to 12 inches beyond the patch. Apply more pressure on the outer edge of the knife to make the mud layer thinner as it moves away from the center. This technique, known as feathering, creates a very gradual slope that the eye cannot detect once painted.
Finishing Touches
You have successfully patched the hole, but the job isn’t done until the wall looks like nothing ever happened. The finishing phase is where patience pays off. Rushing this stage is how you end up with a patch that is smooth to the touch but looks like a shiny sore thumb when the light hits it.
The Art of Sanding
Once your final coat of mud is completely dry (usually 24 hours), it’s time to sand. This is a messy job, so wear a dust mask and cover your furniture.
Using a fine-grit sanding sponge, gently sand the repair in a circular motion. Your goal is not to sand off the mud you just applied, but to smooth out ridges and blend the outer edges into the existing wall. Run your hand over the patch frequently; your fingers will detect ridges that your eyes might miss.
Pro Tip: If you are working indoors and want to avoid the dust cloud, consider wet sanding using a damp sponge. It takes a bit longer but keeps the air clean.
Texture Matching (If Applicable)
If your walls are perfectly smooth, you can skip this step. However, most homes have some level of texture, such as “Orange Peel” or “Knockdown.” If you paint a smooth patch on a bumpy wall, it will stand out.
You don’t need a professional hopper gun for small repairs. You can buy aerosol cans of spray texture at any hardware store. Shake the can well, test the spray pattern on a piece of cardboard first to match the size of the droplets on your wall, and then lightly spray the patch to blend it in.
Priming and Painting
This is the most common mistake DIYers make. Do not paint directly over raw joint compound.
Drywall mud is porous and thirsty; it will suck the moisture right out of your paint, causing the finish to look dull and flat compared to the rest of the wall. This phenomenon is called “flashing.” To prevent this, apply a coat of high-quality drywall primer (or a self-priming paint) specifically to the patch area first. Once the primer is dry, you can paint the entire wall or feather the paint out for a seamless finish.
Conclusion
There is a unique sense of satisfaction that comes from staring at a pristine wall and knowing that you fixed it. You didn’t just cover up the problem; you restored the structural integrity of your home. By following these professional steps—squaring the hole, backing it properly, and feathering the mud—you’ve ensured that your repair will last as long as the house itself.
So, the next time a doorknob goes rogue or a furniture move goes wrong, don’t worry. You have the tools and the knowledge to handle it like a pro.
Looking for your next project when this is done? Learn how to improve the air quality in your home.
Frequently Asked Questions (FAQ)
Q. Why did my drywall patch crack after a few weeks?
A. If a hairline crack appears around the perimeter of your square patch, it is almost always because you skipped the tape. Joint compound alone has very little structural strength. As your house expands and contracts with temperature changes, the mud snaps. Bedding paper or mesh tape into the mud is the only way to bridge the seam and prevent future cracking.
Q. Can I use toothpaste to fill small nail holes?
A. This is a classic "life hack" that you should absolutely avoid. While it might look white and fill the hole temporarily, toothpaste dries brittle, shrinks significantly, and—most importantly—is food-based. It can eventually crack, yellow, and even attract ants or mold inside your wall. Stick to a $5 tub of spackle; it’s safer and lasts forever.
Q. What is the difference between Spackle and Joint Compound?
A. Think of Spackle as a filler and Joint Compound as a glue.
Spackle: Best for tiny nail holes. It doesn't shrink much and dries fast, but it is structurally weak.
Joint Compound (Mud): Best for large repairs. It shrinks more, but it dries very hard and is designed to bind drywall sheets together.
Q. Do I really need to buy a huge sheet of drywall for a small hole?
A. Not usually! Most big-box hardware stores sell "project panels" or "repair panels," which are handy 2-foot by 2-foot squares of drywall. This saves you from trying to strap a massive 4x8 sheet to the roof of your car. Just make sure you match the thickness of your existing wall (usually 1/2-inch for modern homes or 5/8-inch for garages/firewalls).