How to Set Up a Secure Home Wi-Fi Network in 7 Simple Steps
Are you trying to setup your wifi and trying to set up a secure home wi-fi network? You’ve come to the right place. Imagine leaving your front door wide open, unlocked, with a neon sign pointing inside. You wouldn’t do that to your physical home, yet millions of people effectively do this to their digital homes every day by leaving their Wi-Fi routers on factory settings.
Your router is the digital front door to your house. It manages the traffic for your laptops, phones, smart TVs, and even your security cameras. If that door isn’t bolstered with the right locks, you are vulnerable to “piggybacking” neighbors stealing your bandwidth or, worse, bad actors intercepting your personal financial data.
According to the Federal Trade Commission (FTC), securing your router is the first and most critical line of defense in protecting your personal information from identity theft.
The good news? You don’t need a degree in computer science to set up a secure home wi-fi network.
While the Cybersecurity & Infrastructure Security Agency (CISA) generally recommends complex protocols for enterprise businesses, they note that securing a home network really comes down to just a few adjustments in your settings. In this guide, we will walk you through how to set up a secure home Wi-Fi network in 7 simple steps that take less than 30 minutes to complete.
What You’ll Need to Get Started Setting Up Your Secure Home Wi-Fi Network
Before we dive into the settings of your secure home wi-fi network, make sure you have the following ready:
-
Your Router: Located and plugged in.
-
A Computer or Smartphone: Connected to the router’s current network.
-
Ethernet Cable (Optional): Hardwiring your laptop to the router during setup is often smoother than doing it over Wi-Fi, but it’s not strictly required.
Ready to lock the digital door? Let’s get started with Step 1 of setting up a secure home wi-fi network.
Step 1: Place Your Router in the Optimal Spot
Most people treat their router like an ugly appliance, hiding it in a basement corner, behind a TV, or inside a cabinet. While this might help your home decor, it hurts your security and performance.
Security isn’t just about software; it is also physical. If your router is placed on a windowsill facing the street, you are blasting your signal directly to the neighborhood. This makes “wardriving” (where hackers drive by searching for vulnerable networks) significantly easier.
To maximize performance while minimizing signal bleed into the street, follow these placement rules:
-
Centralize It: Imagine your Wi-Fi signal like ripples in a pond, moving outward in all directions. Placing the router in the center of your home ensures the “ripples” cover your rooms, not your neighbor’s yard.
-
Elevate It: Radio waves travel best downwards and laterally. Placing your router on a high shelf or mounting it on the wall is superior to leaving it on the floor.
-
Avoid Interference: Keep the router away from thick concrete walls and large metal appliances. According to the Federal Communications Commission (FCC), devices like microwaves and cordless phones operating on similar frequencies can disrupt your signal, causing connection drops that might look like a network attack but are actually just interference.
By positioning your router correctly, you ensure your signal is strong where you need it (the living room) and weak where you don’t (the parking lot).
Step 2: Log Into the Router’s Admin Panel
To change the locks, you have to get inside the house. In networking terms, this means accessing your router’s administrative interface (often called the “Admin Panel” or “Dashboard”). This is the cockpit where all security changes happen.
Check the Hardware First
Flip your router over and look for a sticker on the bottom or back. It will usually list:
-
Default Access/IP Address: (e.g.,
192.168.1.1or10.0.0.1) -
Default Username: (often
admin) -
Default Password: (often
passwordor a random string of characters)
Find Your Router’s IP Address (If the Sticker is Missing)
If you cannot find the sticker, you can locate the router’s address (called the “Default Gateway”) through your computer’s system settings.
-
For Windows Users: The fastest way is to use the Command Prompt, as hidden menus can vary by Windows version.
-
Press the Windows Key and type
cmd, then press Enter. -
In the black box, type
ipconfigand hit Enter. -
Look for the line that says Default Gateway. The number next to it (e.g.,
192.168.0.1) is your router’s address.
-
Resource: You can also view your connection properties via the Microsoft Support: Essential Network Settings guide.
-
-
For Mac Users:
-
Click the Apple Icon > System Settings (or System Preferences).
-
Click Network and select your Wi-Fi connection.
-
Click Details… (or Advanced).
-
Provide the address listed next to Router.
-
Resource: Apple provides a detailed breakdown of these menus in their Wi-Fi Settings on Mac guide.
-
Login
Open your web browser (Chrome, Safari, Edge) and type that IP address number into the address bar (where you usually type “https://www.google.com/search?q=google.com”) and press Enter. Enter the username and password from the sticker to access the dashboard.
Step 3: Change the Default Administrator Password
This is the single most common mistake people make when setting up a new router.
It is vital to understand that your router has two different passwords:
-
The Wi-Fi Password: The one you give to guests so they can connect their phones to the internet.
-
The Administrator Password: The one used to log into the dashboard you are currently looking at.
If you leave the Administrator password as the default (often “admin”), anyone who connects to your Wi-Fi—even a guest you invited over—can log into your router and change your settings, view your traffic, or lock you out of your own network. Hackers also have access to massive databases of default passwords for every router model ever made.
How to Fix It:
-
Look for a tab in the dashboard labeled “Administration,” “System,” or “Maintenance.”
-
Select “Change Password” (sometimes labeled “Set Admin Password”).
-
Enter the old password (from the sticker) and create a new one.
Make it Strong:
Do not use “123456” or “Password.” According to CISA’s Guide to Strong Passwords, a strong password should be at least 16 characters long. The agency recommends using a random string of words or a passphrase (like Coffee-Train-Jump-Blue-22) which is harder for computers to crack but easier for humans to remember than complex gibberish.
Once you save this change, the router will likely kick you out and ask you to log in again with the new credentials.
Step 4: Rename Your Network (SSID) to Something Generic
The Service Set Identifier (SSID) is simply the name of your Wi-Fi network—the name that pops up on your phone when you are trying to connect.
Router manufacturers usually ship devices with default names like BrandName_ModelNumber (e.g., Linksys_E4200 or Netgear_5G). This might seem harmless, but it provides a hacker with two pieces of critical information:
-
The Brand: They now know exactly who made your router.
-
The Model: They can look up specific security flaws or “exploits” that affect that specific model.
The “Vanity Plate” Mistake
Many people change the default name to something personal, like SmithFamily_Wi-Fi or Apartment_304. This is equally dangerous because it confirms exactly who owns the network and where the signal is coming from, making you a verified target rather than a random signal.
How to Fix It:
-
Navigate to the “Wireless,” “Wi-Fi,” or “WLAN” tab in your dashboard.
-
Find the SSID or Network Name field.
-
Change it to something that identifies neither you nor the device.
Ideas for Secure Names:
-
Deterrents: FBI_Surveillance_Van or Virus_Infected_Network
-
Boring/Invisible: Network_Error or Loading…
-
Generic: Blue_Sky or Coffee_Shop
By making your network name generic, you aren’t making it impossible to hack, but you are making it a much less interesting target than the “Smith Family” next door.
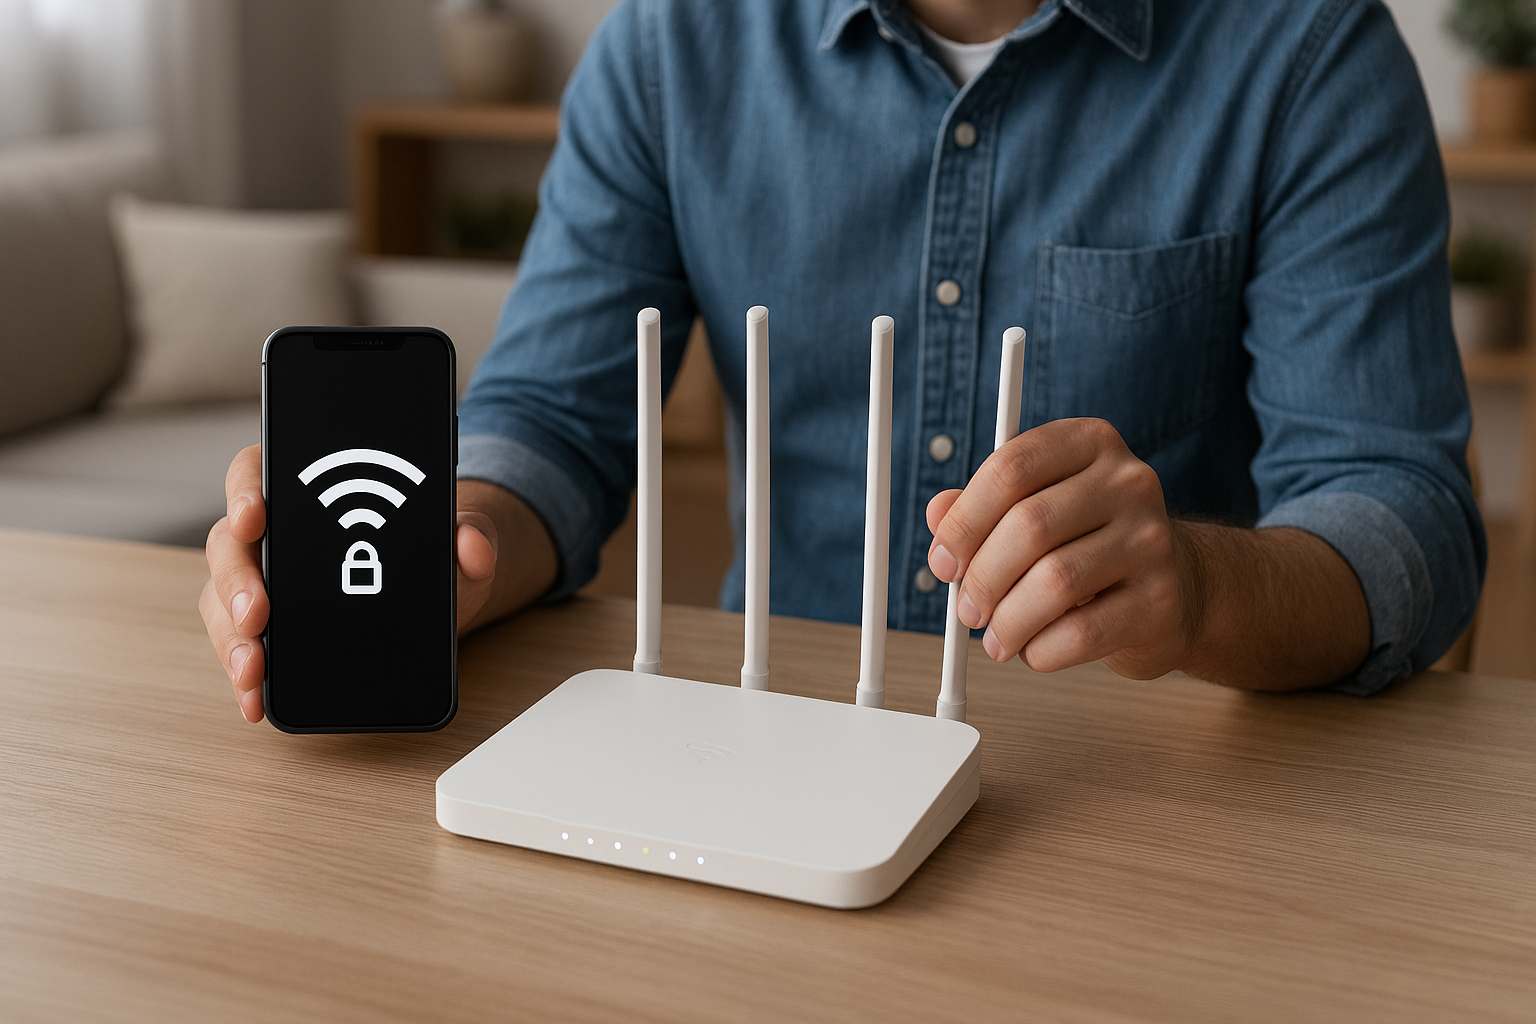
Step 5: Select WPA3 or WPA2-AES Encryption
If the password is the key to your network, “encryption” is the language your devices speak once they are inside. Proper encryption scrambles your data so that even if someone manages to intercept the signal flying through the air, it looks like gibberish rather than your credit card number.
Find the Setting: In the “Wireless” or “Wireless Security” tab (often on the same page where you changed the name in Step 4), look for a drop-down menu labeled “Security Mode” or “Authentication Type.”
The Right Choice:
-
Best: WPA3-Personal. According to the Wi-Fi Alliance, the industry body that sets Wi-Fi standards, WPA3 is the latest generation of security. It provides robust protection even if your password isn’t very complex.
-
Good: WPA2-Personal (AES). If your router is a few years old, it might not support WPA3. That is okay. WPA2 with AES (Advanced Encryption Standard) is still the industry standard for most homes and is very secure.
The Danger Zone (Avoid These):
-
WEP: This is ancient technology from the 90s. It is so weak that a novice hacker can crack it in minutes.
-
WPA (TKIP): An older standard that is no longer secure.
Note: If you select “WPA2/WPA3 Mixed Mode,” it allows newer devices to use the super-secure WPA3 while still letting older devices (like an old printer) connect via WPA2. This is often the most compatible choice for modern homes.
Step 6: Create a Strong Wi-Fi Passphrase
Now that you have chosen the encryption method (the lock), you need a key (the password) that lets your devices in.
This is the password you will type into your iPhone, laptop, or smart TV to connect to the internet. Unlike the “Admin Password” from Step 3 (which protects the settings), this password protects the network access.
The “Pre-Shared Key”
In your router settings—usually right under the Encryption/Security Mode you just selected—you will see a field labeled “Password,” “Passphrase,” or “Pre-Shared Key.”
The Golden Rule: Length Beats Complexity
For years, we were taught to make passwords like P@55w0rd!. However, modern cracking software can guess short, complex passwords relatively quickly.
The National Institute of Standards and Technology (NIST) has shifted its guidance to favor passphrases—longer sequences of random words. A passphrase is mathematically harder for a computer to crack but much easier for a human to type.
-
Weak:
Tr0ub4dor&3(Hard to remember, surprisingly easy to crack). -
Strong:
Correct-Horse-Battery-Staple(Easy to remember, very hard to crack).
Action Plan:
-
Create a passphrase that is at least 12-15 characters long.
-
Use a mix of uppercase letters, lowercase letters, and at least one number or symbol if your router requires it.
-
Avoid common phrases or lyrics (e.g., “Don’tStopBelieving”).
-
Enter this new passphrase into the field and click Save or Apply.
Warning: The moment you hit “Save,” your computer will disconnect from the Wi-Fi because it is still trying to use the old password. You will need to reconnect to your newly named network (from Step 4) using this new passphrase.
Step 7: Update the Router Firmware
You wouldn’t run your laptop on Windows 95 today because it is full of security holes that were never patched. The same logic applies to your router.
“Firmware” is simply the operating system that runs your router. Manufacturers like Netgear, Asus, and TP-Link frequently discover bugs or security vulnerabilities in their code and release updates to fix them. If you never update your firmware, you are leaving those holes open for attackers.
How to Update:
-
In the Admin Dashboard, look for a tab labeled “Administration,” “System Tools,” or “Advanced.”
-
Click on “Firmware Update” or “Router Update.”
-
Click the button that says “Check” or “Check for Updates.”
-
If an update is found, click “Upgrade.”
Pro Tip: Many modern routers now have a switch for “Automatic Updates.” If your router supports this, turn it on immediately. This ensures you receive critical security patches overnight without having to log back in every month.
Bonus Tip: Set Up a “Guest Network” for Smart Devices
Here is a secret that IT professionals use: Guest networks aren’t just for guests.
Your “Smart Home” devices—cheap Wi-Fi security cameras, smart lightbulbs, and connected refrigerators—often have very weak built-in security. If a hacker manages to compromise your smart lightbulb, they can use that connection to jump over to your laptop and steal your banking files.
To prevent this, enable your router’s “Guest Network” feature.
-
What it does: It creates a separate Wi-Fi access point that gives devices access to the internet but prevents them from communicating with other devices on your main network.
-
The Strategy: Connect all your “dumb” smart devices (TVs, bulbs, speakers) to the Guest Network. Keep your computers and phones on the Main Network.
-
Resource: The FBI (Portland Field Office) explicitly states: “Your fridge and your laptop should not be on the same network. Keep your most private, sensitive data on a separate system from your other IoT devices.”
Set Up a Secure Home Wi-Fi Network Conclusion
Congratulations! You have successfully locked your digital front door.
By changing your default password, renaming your network, and enabling the right encryption, you have made your home significantly less attractive to cybercriminals. While no network is 100% hack-proof, these 7 simple steps move you from being an “easy target” to a “hard target”—and most hackers will simply move on to the next house.
Now that your network is secure, check out our guide on How to Grow Your Own Organic Food.
Frequently Asked Questions (FAQ)
Q. I forgot my Router Admin password. What do I do?
A. Don't panic—this happens to everyone. You can reset the router to its factory default settings.
The Fix: Look for a small, recessed button labeled "Reset" on the back of the router. Use a paperclip to press and hold it for about 10–15 seconds until the lights flash.
The Result: This wipes all your custom settings (including your new Wi-Fi name) and restores the default credentials printed on the bottom sticker. You will need to repeat the setup process described in this guide.
Q. Should I “Hide” my Network Name (SSID) to be more secure?
A. Many people believe that selecting "Hide SSID" in the settings makes them invisible to hackers. In reality, this provides very little protection. Hackers use scanners that can easily detect "hidden" networks. Furthermore, hiding your SSID can actually make your devices connect slower or drain their batteries faster as they constantly search for the hidden signal. It is better to have a visible network with strong encryption (WPA3/WPA2) than a hidden network with weak security.
Q. Do I need a VPN if my Wi-Fi is secure?
A. A secure router protects your connection from neighbors and local attackers, but it doesn't protect your data from your Internet Service Provider (ISP) or websites tracking you.
What a VPN does: It encrypts your traffic before it leaves your device, masking your activity from your ISP.
Verdict: While not strictly necessary for a secure home setup, using a VPN is an excellent "next step" for privacy. The Federal Trade Commission (FTC) suggests using a VPN if you want to minimize how companies track your online behavior.